Hi! Welcome! If you're new here, you probably got here from Laurie's blog, Tip Junkie! Nice to "meet" you!
Well, my three favorites are going to be kinda unusual, I'm afraid. My husband and I want to add a third kiddo to our family, so we've had babies on the brain. That always leads to baby names.
So, here are my three favorite baby names.
* Andrew Thane - We would call him Drew, not Andy! Thane comes from a Janette Oke book I read years ago--he was the "hero" and his character reminded me, even back then, of my husband, Slade. I know, Awwwww...)
* Darvi or Darby Ruth - Ruth is my mom's name
* Rebekah Renee - Rebekah is one of my favorite girl names and it would stick with the "R" theme we seem to have going with our first two boys--Russell and Randall. Renee is my middle name.
So, to be entered in the giveaway for a refrigerator scrapbook, custom designed just for you, leave a comment on this post telling me your three favorite baby names. I know, everybody say "Awwwww...."
Then, go back to Tip Junkie and leave a comment there so she'll know you've visited here and tell what you would like your refrigerator album to look like. Do you like dog-themes? Are your favorite colors red and black? Do you like a Western look? That helps me know what kind of items would sell *and* I'll know what the winner wants.
Of course, if you win, your comment isn't binding. You can change your mind! We'll work together to make your refrigerator scrapbook perfect for your refrigerator. Or, if you're giving it away as a gift, we'll make it exactly what you want for them, too!
Here is the refrigerator scrapbook that is on my fridge. It's very easy to trim regular snapshots or professional portraits down to fit on the "pages".
This is what I can do to personalize your album. As long as it's not too many words, I can type up whatever you want. The outside front and inside top can be personalized.
Some more examples of tins I've customized.
Remember, if you don't win, you are still eligible for 10% off of your entire purchase from me! You can check out my etsy store and either order something already listed or give me specifics for a custom order. Contact me and I'll send you a revised invoice with 10% off!
Thanks for visiting!
Monday, June 30, 2008
Tuesday, June 24, 2008
Popsicle anyone?
Happy Summer! For some reason, popsicles make me think of summer!
I found this "recipe" (haha, pun intended!) on Patty's blog Patty's Stamping Spot for a popsicle card.
I didn't adhere the ice cream center (aka white cardstock) to the card yet, because I figure it will be easier to write my note without the stick in the way. When I am ready to sign it and give it away, I'll use pop dots to adhere it and make the popsicle more 3-D. Who likes a flat popsicle anyway? :-)
I don't have any fruit stamps or even anything that would work with a popsicle, but I like it plain, too. And, I did order some fruity/summery stamps from Whipper Snapper Designs.
I have a lady on etsy that wanted a cherry-themed refrigerator scrapbook (a Mary Engelbreit look) and I couldn't find exactly what I wanted, so we agreed that stamping my own paper would work perfectly. So, then I had an excuse to get the stamp set I already had on my wish list. It's a win-win, don't you think? :-)
Are you a tip junkie?!
Laurie of Tip Junkie is hosting a 20+ day giveaway on her blog! More than 20 Mom-Prenuers are giving away their handmade items! I will be giving away something fun, too, but it's not my turn yet. So, go check out Laurie's blog, follow her instructions, and see how it goes!
If you do not win on the day my products are featured, you can still go to my etsy store and get a 10% discount on your purchase. Just e-mail me with your order and tell me you heard of me through Tip Junkie and I will discount your entire order by 10%. This includes custom orders, as well!
So, what are you waiting for?! Head on over to Tip Junkie! And, then come back here, too!
CD Holder and Thank You Card in One
A few weeks ago, we enjoyed a week with my Grandpa and his wife, Nancy. They fed us, provided fresh, clean beds to sleep on, the use of their washer and dryer and just made it a wonderful vacation for us!
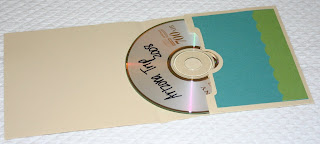
We had a great time and I wanted to let them know how much it was appreciated. I had a CD of pictures to send them that I had taken from our time there, so I googled a CD holder and found this template. I changed it up a bit, since I was using it for a card instead of an album, and then made it my own style and this is what I ended up with. I sort of used Taylor's sketch-TECC20, but I changed it up a bit (and I was way too late to post it to her challenge--Bummer!).
I had room on the left inside to write a note.
I'm so, so pleased with how well it all came together and it was exactly what I pictured! I don't know if I'll ever have a reason to make another one, but this one was perfect.
I hope G'pa Roger and G'ma Nancy know how much they are appreciated and loved!
I'll leave you with a picture from our trip. My husband, Slade, didn't make it and my mom was taking the picture. We also had an extra kiddo, my nephew, Josh.
Back (L-R) My dad, me, G'pa Roger, Nancy.
Front (L-R) Randall, Josh, Russell
Stamps: Grasshopper Fluffles by Stampendous!
Paper: cardstock, My Mind's Eye patterned paper
Tools: copic markers, scor-pal, corner rounder with guard removed
Saturday, June 14, 2008
Marble Magnets
I love making the marble magnets I sell in my etsy store and at craft shows. They are simple (although there are a few steps) and they are just so neat! The glass marble magnifies the image underneath and it just looks clear and crisp.
Here is a picture of the front of a set of magnets. I have this set on my refrigerator.
Here is a view of the back of one of the magnets. These magnets are strong enough to hold 6 or sheets of paper securely. I love them!
Marcie (who is 1/2 of my favorite singing group, 40 miles North) asked how I make them. So, I thought I'd give you my long, detailed description. I discovered this fun idea on FamilyFun.com.
So, here we go!
Like the article says, trim your images before you glue them on. I've seen people say glue it and then trim the excess off, but it looks terrible on the back and warps the image!
So, you'll have your images already trimmed and the marble picked out for each image. Then I use a dab of Aleene's tacky glue (sold at any craft store) on one image, press it onto the glass marble and then move the image around to get the glue all over. Let it sit for a short while (like maybe while you do a few more).
Then, while the glue is still slightly wet, press around the edges to mold them to fit the edge of the marble. (Do circles have edges?) That makes all the difference! If you don't do this step, the image won't sit flat on the marble and it won't look as good. The tacky glue goes on white, but dries perfectly clear!
Then glue your magnets to the paper on the marble. I use tacky glue for that, too, and it's always been strong enough. You can buy small magnets at Wal-Mart (10 for $1.10-ish) or super strong neodymium magnets from eBay (like I do), if you plan to make a lot.
Here are some extra ideas:
* consider the colors in the kitchen of the recipient, if giving them as gifts
* decorate an altoids tin (rectangle or circle) for a teacher and put a set of magnets inside--once the magnets are on her/his filing cabinet, they now have a holder for small odds and ends
* use magazine images
* use symbols from an old map/atlas
* use small photos (really small...), printed on regular paper/cardstock, not photo paper
* type names, silly words, etc up on the computer in a small font
* do a few for each child in their favorite color(s) and let them hang their artwork on the fridge--when they use up all their magnets, they have to take off old artwork to hang new (sneaky, eh?)
* use left-over wrapping paper to make holiday magnets you pull out each year
* glue a thumbtack to the back instead of a magnet and let Dad take to work
* glue a thumbtack to the back and let kids use to hang up pictures of friends/schoolwork on a bulletin/cork board
If you give these as gifts, you can put them in a tiny ziplock bag (you can buy 100 tiny craft zip top bags at Hobby Lobby for about $2 or less). If you're really ambitious, you could make a topper to decorate and staple to the top.
Let me know if you make some! I'd love to see pictures! Or if it's more work than you want to do, let me make them for you!
A Refrigerator What?
What is a refrigerator scrapbook? I'm so glad you asked!
I have been making altered altoids tins with accordion scrapbooks inside for about a year. One evening, a few months ago, my mom and I were sitting on the couch chatting about an upcoming craft show and my mom said, "You know, you could make one of these to go on a refrigerator." We talked about the idea she saw in her head and I tweaked it a little and made an example within the week. I also made a few to take to my next craft show, but I have to admit, I was a little bit skeptical. I just didn't know if anyone would want something like that to go on their refrigerator.
Here is the one I made of my boys to go on my refrigerator and to go with me to craft shows as an example.
My mom liked them so much, she requested one for her birthday. So, I made her one that said "Grandkids" on the front and "We love Grammy!" on the inside. I gave it to her without any pictures in it and then had to take it back to add in grandkid pictures (she said it was incomplete!). While I had it, I used it as an example of how I can personalize an album at my next craft show.
I was very pleasantly surprised when the refrigerator scrapbook became the talk of the show! People would come over and say, "Okay, I was sent here by so and so who said I just have to come see your scrapbooks for the refrigerator!" or "What's this I hear about a scrapbook you hang on your refrigerator?" and so on. I had to go back to my mom and apologize for doubting the popularity of her idea.
I also had to re-make her refrigerator album, because a very persuasive woman really, really wanted it. She said her grandkids called her "Grammy", too, and she was from out of town, so she didn't want to have to pay shipping to have one personalized and sent to her. I haven't quite lived that one down and I get reminded from time to time of how I sold my mom's birthday present right out from under her nose after I had already given it to her... Oops...
Here is what the front of a refrigerator scrapbook looks like. This one is unpersonalized.
Here is an inside view. You just trim your pictures and adhere them using double-sided tape or a glue stick.
Here is a picture of the simple way I personalize the albums. I have also used stickers and rub-ons.
The idea is original, as far as we know, but I'm sure others out there have thought up similar ideas. Great gift idea and they can be made using the colors or styles you request. I am making a cowboy refrigerator tin for someone's little "Buckaroo". The possibilities are endless.
So, I guess it just goes to show you, mother always know best!
My mom wanted some graduation cards recently and I have only one graduation stamp and it wasn't doing what I wanted it to do, so I decided to attempt to paper piece. I actually used the stamp as my template, of sorts, and came up with this. The Senior goes to a Christian school here in town and the colors were silver and blue.
I printed the Congratulations on the computer. I used a set of foam alphabet stamps I got at Hobby Lobby many moons ago for the "grad" word, but it didn't seem to stand out, so I used a scrapbook pen and doodled around the edges of the letters. I like how that made them pop. It also makes the card even more "handmade".
A close up of the graduation hat. I used a piece of yellow embroidery floss for the tassel and a small round brad to hold it in place.
I made two of these and once I figured out what I wanted to do for the graduation cap, they were both pretty quick and easy.
Happy Graduation!
Monday, June 9, 2008
Paper Bag Scrapbook Albums
I don't very often post about things I'm selling in my etsy store, but I am hoping to be featured on TipJunkie's blog and to do that, I need a direct link to my products.
So, I'll start by describing what a paper bag album is.
I start with 3 paper bags that have been treated (to make them acid-free) and pressed (to get the wrinkles out). They have also been folded, sewn down the seam (to make them more durable) and 5 holes punched in the spine. I don't do any of that work! I buy them from a lady on eBay who I've been buying them from for almost 2 years. She's the best I've found for quality and a great price!
Then I choose a theme or whatever papers I want to use and I go for it! I'm working on a ballerina album and a princess album right now. My niece (she's turning 4 in a few days) gave both a thumbs up and couldn't decide which she liked better. That's a good sign! :-)
Here is a pirate paper bag album I have listed in my etsy store right now.
The front cover:
Some of the inside pages, with matted journal blocks and a matte for 4x5 pictures. The pages without mattes are perfect for a collage of pictures.
This one has an extra pocket inside for extra pictures, notes, flat souveniers, etc. The brads are gold since pirates look for gold.
Here is a side view of a different album to show the depth and detail of the side.
My favorite thing about paper bag albums is that the opening from the paper bag creates a pocket that is perfect for pictures, movie tickets, ticket stubs, report cards, well baby check measurements, notes, etc. Each pocket has a blank tabbed pull-out page for journaling or for a drawing, etc.
These books are so easy to personalize with photos from a specific occasion or they can be given away for the recipient to fill. These books can also be made to fit your specific ideas. Favorite animals, school colors, wedding, baby's first year, specific themes, anything! If you can dream it (and I can find the paper for it) it can be made! :-)
Subscribe to:
Posts (Atom)